About the Cardigan
I'm going to show you how I made a hexagon cardigan, and it only works with the granny stitch. I'd suggest using a variegated yarn as I think that would work really well but for the purposes of the tutorial, I'll be using solid colours. I also have a video tutorial of this pattern available on YouTube and the link to that video is available below.

Materials
The materials you will need are:
* Some yarn in your chosen colour
* A crochet hook
* A tapestry needle
* Some scissors
For the example I used DK weight acrylic yarn and a 4mm crochet hook.
American crochet terms are used for this tutorial:
Dc = Double Crochet
Ch = Chain
Ch-sp = Chain space
Mc = Magic circle
Sl-st = Slip Stitch
Instructions
A: Granny Stitch Hexagon (Make 2)
=================================
Round 1
------------
The cardigan I'm making is a hexagon cardigan, and it only works with the granny stitch.
To start, make a magic ring. Ch 3 which counts as a Dc and do 2 more Dc into the Mc. Ch 2 then do 3 Dc into the Mc. Repeat that 4 more times then Ch 2 and Sl-st into the third Ch from the beginning of the round.
Pull the tail of the Mc closed and that completes round 1. You should have 6 clusters of 3 Dc separated by 2 chains. The Ch 2 spaces will be the corner points.

Round 2
------------
Every round begins in the corner, so slip stitch until the corner which is the Ch 2 space. Ch 3 which counts as the first double crochet, then add 2 more Dc into the Ch-sp. Ch 2 and add 3 more Dc into the same Ch-sp to form the first corner. Ch 1 and insert 3 Dc into the Ch-sp followed by a Ch 2 and another 3 Dc into the same space.
Repeat this till the end of the round. Finish the round with a chain 1 and then Sl-st into the 3rd Ch at the beginning of the round. Sl-st to the corner to get ready for the next round.

Round 3
------------
Starting at the corner again, Ch 3 and add 2 Dc, Ch 2 and add 3 double crochet into that same chain 2 space. That's the corner created. Now chain 1 and place 3 Dc into the Ch 1 space. The next is a Ch 2 space which is our corner so we're going to do a Ch 1, 3 Dc, Ch 2 and 3 Dc into the same space.
Ch 1 and repeat until the end of the round. Finish the round again with a Ch 1 and Sl-st into the 3rd Ch at the beginning of the round. Sl-st into the corner to start the last round.

Round 4
------------
My amigurumi usually measure around 10 inches tall so 4 rounds is enough to make a cardigan that is the correct size for them to wear.
Finish the final round in the same way we have done the previous rounds by doing 3 Dc in the Ch 1 spaces and then 3 Dc, Ch 2 and 3 Dc into each corner space. Once the final round is complete, leave a long tail to whip stitch the sleeve shut.
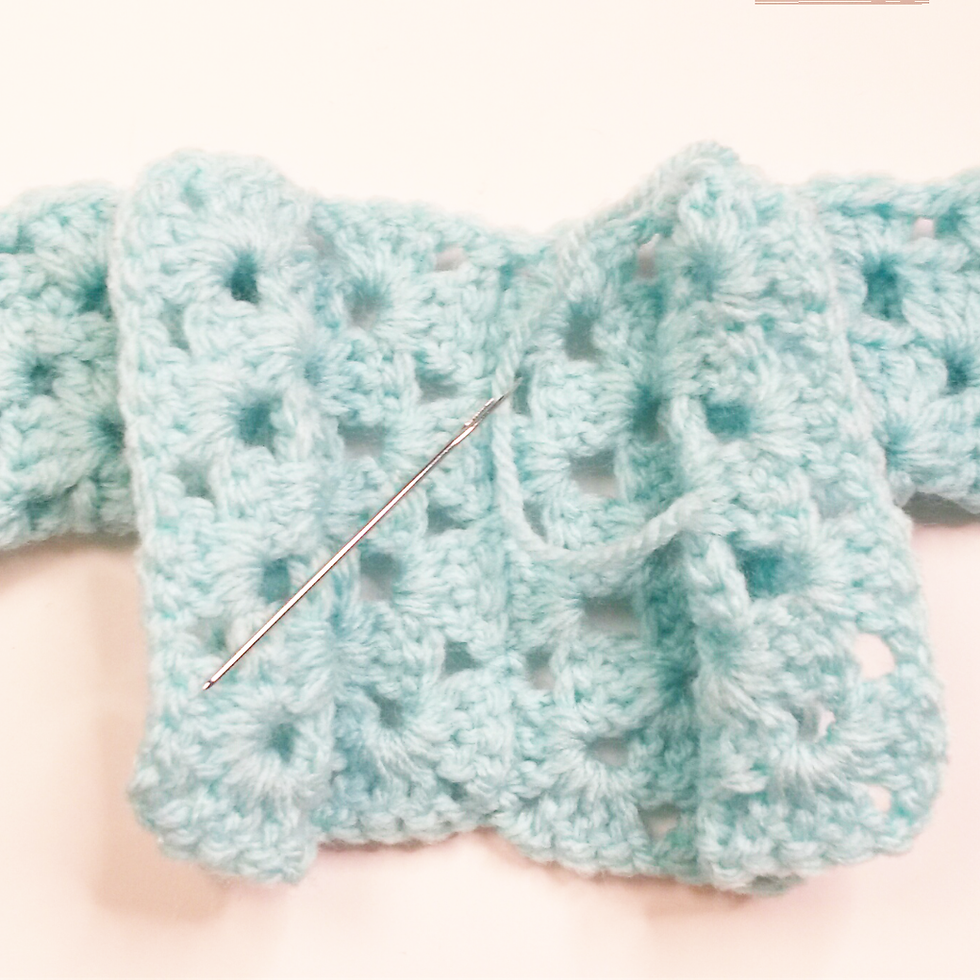
Align two corners together (usually it's just two opposite corners) - you should get an L shape or half a T shape when you do this (as shown in the picture). This shape already looks like one side of the cardigan.

To whip stitch the sleeve together remember to leave the inner corners unattached since they will serve as the back seam and the front of the cardigan (as shown in the picture).
B: The Other Side of the Cardigan
=================================
For the other side of the cardigan, just repeat the 4 rounds again to get the second side and whip stitch the 2 sides together at the back seam.

The cardigan is complete. You can add buttons if you wish or hook and eye closures, or leave it as it is. The choice is yours. All that's left to do is weave in the tail ends with the tapestry needle.

I also have a join as you go method so that you can avoid whip stitching altogether and that's in my video tutorial. Please click on the video thumbnail to be taken to the YouTube video.
Writing patterns is not my strongest skill but hopefully you've been able to follow this and found it useful! If you find any mistakes or problems with clarity please do let me know by submitting a feedback form and I will do my best to correct the issue as soon as possible.
This is my first tutorial for this site and I hope you find it usable and helpful. Thanks for your support and I look forward to hearing from you.
